Setup Cloudflare routes email in Gmail send email as
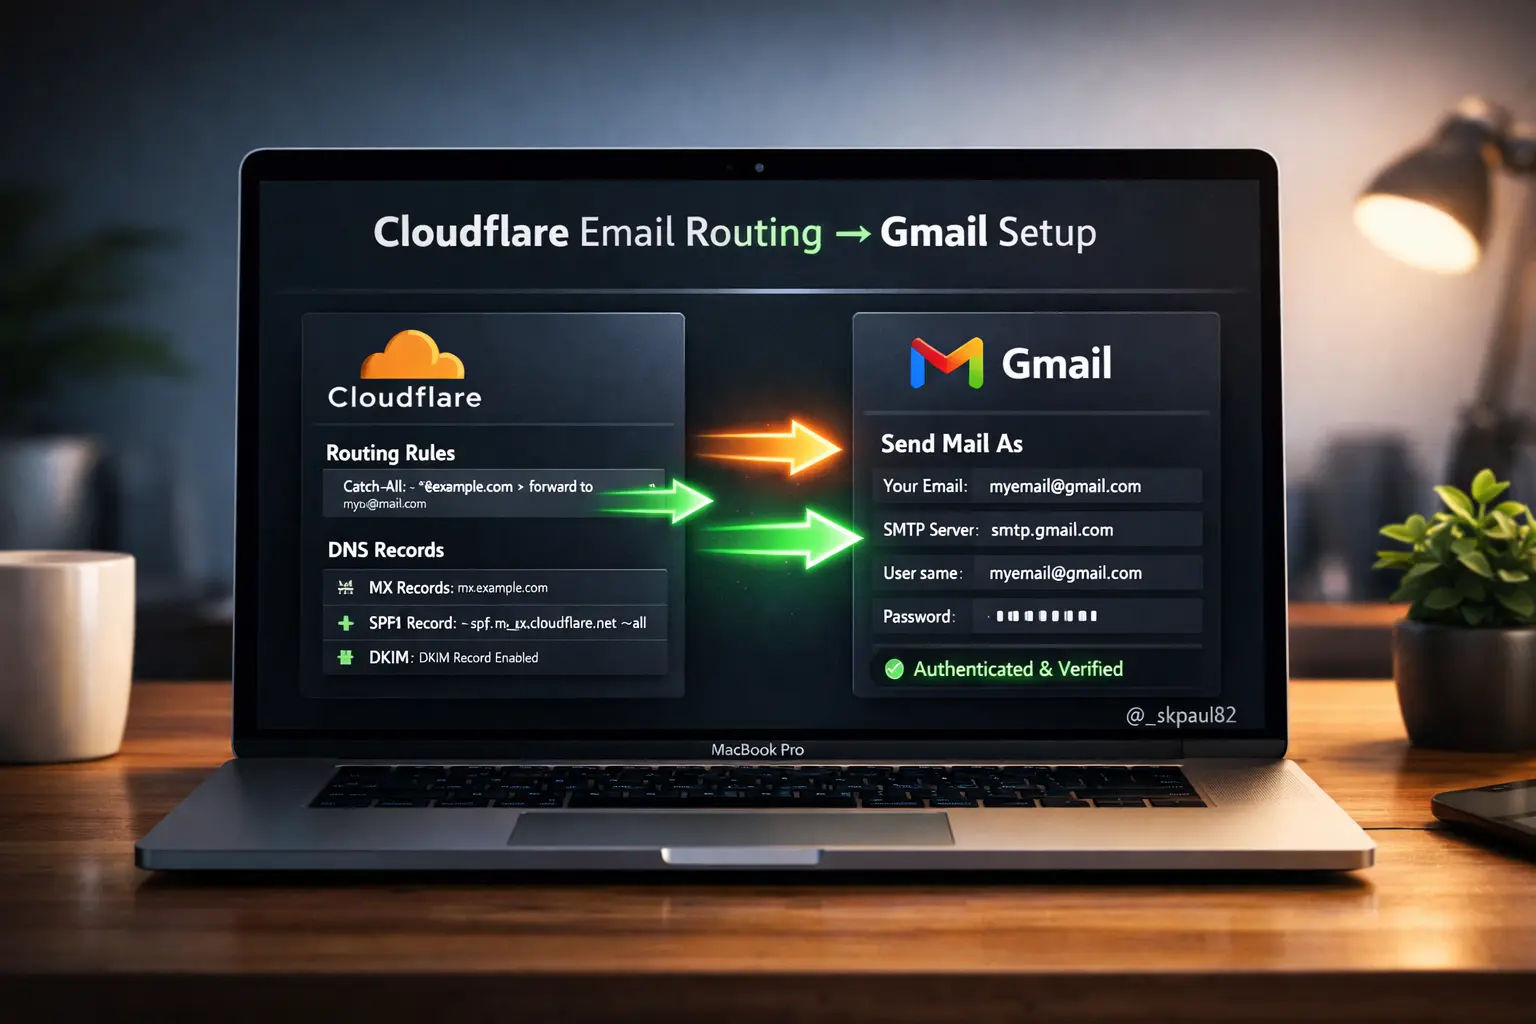
To set up Cloudflare Email Routing with Gmail’s “Send mail as” feature, you’ll first configure Cloudflare to forward incoming mail to your Gmail address, then use Google’s SMTP servers as a bridge for outgoing mail.
1. Configure Cloudflare Email Routing
- Onboard Domain: In the Cloudflare Dashboard, go to Email > Email Routing and select Onboard Domain.
- Add Records: Cloudflare will prompt you to add necessary MX and TXT (SPF) records. Select Add records and enable.
- Create Routing Rule:
- Go to the Routing Rules tab and click Create address.
- Custom address: Enter your professional email (e.g.,
info@yourdomain.com). - Destination: Enter your personal Gmail address.
- Verify: Check your Gmail inbox for a verification email from Cloudflare and click the link to activate the route.
2. Prepare a Google Account for Outgoing Mail
Because Cloudflare does not provide an outgoing SMTP server, you must use Gmail’s own SMTP service with an App Password.
- Enable 2FA: Ensure 2-Step Verification is turned on in your Google Security Settings.
- Generate App Password:
- Go to the App Passwords page.
- Select Mail for the app and Other (name it “Cloudflare SMTP”) for the device.
- Copy the 16-character password provided; you will need it in the next step.
3. Set up Gmail “Send mail as”
- Add Address: In Gmail, go to Settings > See all settings > Accounts and Import.
- Configure SMTP: Under Send mail as, click Add another email address. Enter your name and custom domain email.
- Enter Server Details:
- SMTP Server:
smtp.gmail.com - Port:
587(TLS) - Username: Your full Gmail address
- Password: The App Password you generated earlier
- SMTP Server:
- Finalize: Enter the confirmation code sent to your email to verify ownership.
4. Update SPF Records (Critical for Deliverability)
To ensure your emails aren’t marked as spam, you must authorize both Cloudflare and Google to send mail on your behalf in your Cloudflare DNS settings. [1, 12]
- Type:
TXT - Name:
@ - Content:
v=spf1 include:_spf.mx.cloudflare.net include:_spf.google.com ~all
5. DMARC Policy
To help both the email recipient and sender protect against email spoofing, phishing, and spam, you should also add a DMARC Policy to monitor emails. Ensure the p parameter is set to none.
In Cloudflare DNS, create a new TXT record:
Type: TXT
Name: _dmarc
TTL: auto
Content: v=DMARC1; p=none; rua=mailto:you@your-domain.com
Or multiple Email Addresses
Content: v=DMARC1; p=none; rua=mailto:you@your-domain.com,hello@your-domain.com
Add them separated by a comma, one after the other, for multiple email addresses.
—
Note: This post is taken from a Google search and is being published here for my future reference.
If this helps you, don’t bother to share! 🙂